Lolin ESP32 OLED で作る WiFi 時計
久しぶりの ESP32 ネタです。
Classic BT が上手く進まないため士気が下がっていたというのは内緒で、表向きには車の整備が忙しかったせいです!
Aliexpress にて OLED の付いた ESP32 が安く売られてる という噂を聞きつけポチっておりましたもの、ようやく着荷いたしました。
有料配達しているにも関わらず、アマゾンの無料配達をやらされてると思い込ませる洗脳キャンペーンを張ったヤマト運輸と違って、正真正銘・完全無料で配達して下さってる日本郵便には頭が下がるばかりです。
(ゆうちょ銀行は救いがたいポンコツ だが、日本郵便は優秀)
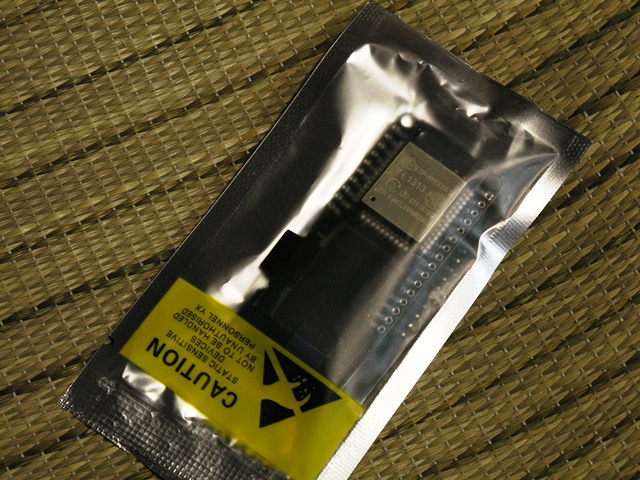
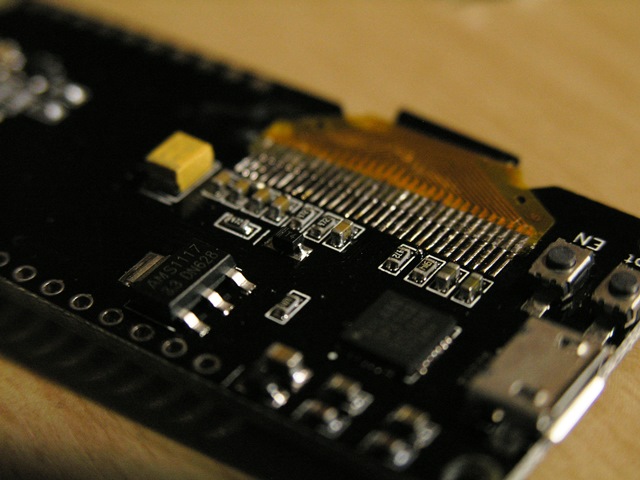

表面実装部品はキレイな実装であるのに対して、OLED がリフローに耐えられないせいだと思いますけど、フレキは手半田されているぽく、半田のカスが残っていたり見れば見るほど不安になってくる仕上がり。
まぁそこは割り切りですけれど。。。
フレキ周辺を中心に半田カスでブリッジしてないかのチェックは必須です。
私のはブリッジしてました(笑)
Git 上のサンプルソース が案内されているものの、なんで ESP32 モジュールなのに ESP8266 のサンプルなの?って具合で、案の定コンパイル通らず。
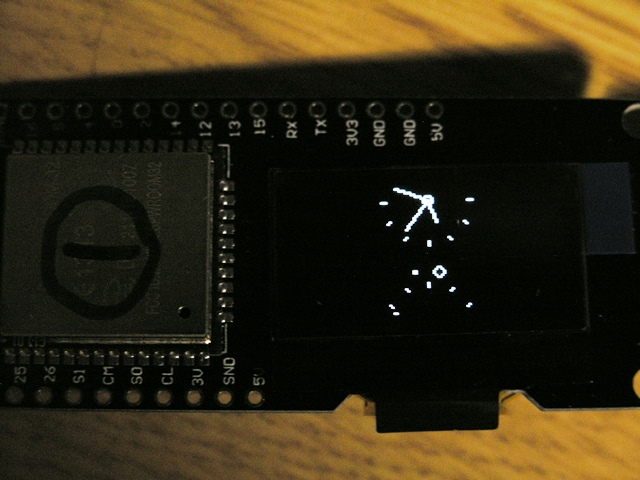
全くと言って情報がないので手こずりましたが、モジュールに載ってる OLED は(たぶん)SSD1306 というやつで、ESP32 との接続は I2C(SDA:IO5、SCL:IO4)ということが分かり、サンプルソースに手を加えることで何とか動きました。
あと、もう一点。
なんか書き込みも変なんですよ、このモジュール。
秋月で売られてる開発ボード と同じく USBシリアル変換チップ CP2102 が載っているので、microUSB直結でいけるんですが、秋月の開発ボードと違って Arduino から「マイコンに書き込み」しても自動的に書き込みモードに移行してくれません。
仕方なく BOOT 押しながら リセット(EN) ボタンを押す旧来の方法も試しますが、それでも書き込みできません。
最初は外れを引いたのかと思いましたが、なんと・・・
BOOT ボタンを押し続けないといけない という腐った仕様であることが判明。
なんだよ、これ・・・
かなり頭に来ましたので、これからお披露目する WiFi 時計は OTA 化も施してやりました。
初回だけは BOOT 押し続けながら・・・が必要ですが、2度目からはオンラインでスルって書き込めます。
これからソースを貼りますが、先に https://github.com/squix78/esp8266-oled-ssd1306 から ZIP をダウンロードしておき、Arduino IDE の スケッチ → ライブラリをインクルード → ZIP形式のライブラリをインストール しといて下さいね。
images.h
const char activeSymbol[] PROGMEM = {
    B00000000,
    B00000000,
    B00011000,
    B00100100,
    B01000010,
    B01000010,
    B00100100,
    B00011000
};

const char inactiveSymbol[] PROGMEM = {
    B00000000,
    B00000000,
    B00000000,
    B00000000,
    B00011000,
    B00011000,
    B00000000,
    B00000000
};
WiFiClock.ino
#include <NTPClient.h>
#include "WiFi.h"
#include <WiFiUdp.h>
#include <ArduinoOTA.h>
#include "SSD1306.h"
#include "OLEDDisplayUi.h"
#include "images.h"

const char *ssid = "<Set Your SSID>";
const char *pass = "<Set Your Password>";
const char *ntpServer = "ntp.nict.jp";
const int ntpInterval = 24;   // 24h
const int timeZone = 9;

WiFiUDP ntpUDP;
NTPClient timeClient(ntpUDP, ntpServer, timeZone * 60 * 60, ntpInterval * 60 * 60 * 1000);
SSD1306  display(0x3c, 5, 4);
OLEDDisplayUi ui ( &display );

int screenW = 128;
int screenH = 64;
int clockCenterX = screenW/2;
int clockCenterY = ((screenH-16)/2)+16;   // top yellow part is 16 px height
int clockRadius = 23;

// utility function for digital clock display: prints leading 0
String twoDigits(int digits){
  if(digits < 10) {
    String i = '0'+String(digits);
    return i;
  }
  else {
    return String(digits);
  }
}

void clockOverlay(OLEDDisplay *display, OLEDDisplayUiState* state) {

}

void analogClockFrame(OLEDDisplay *display, OLEDDisplayUiState* state, int16_t x, int16_t y) {
//  ui.disableIndicator();

  // Draw the clock face
//  display->drawCircle(clockCenterX + x, clockCenterY + y, clockRadius);
  display->drawCircle(clockCenterX + x, clockCenterY + y, 2);
  //
  //hour ticks
  for( int z=0; z < 360;z= z + 30 ){
  //Begin at 0° and stop at 360°
    float angle = z ;
    angle = ( angle / 57.29577951 ) ; //Convert degrees to radians
    int x2 = ( clockCenterX + ( sin(angle) * clockRadius ) );
    int y2 = ( clockCenterY - ( cos(angle) * clockRadius ) );
    int x3 = ( clockCenterX + ( sin(angle) * ( clockRadius - ( clockRadius / 8 ) ) ) );
    int y3 = ( clockCenterY - ( cos(angle) * ( clockRadius - ( clockRadius / 8 ) ) ) );
    display->drawLine( x2 + x , y2 + y , x3 + x , y3 + y);
  }

  // display second hand
  float angle = timeClient.getSeconds() * 6 ;
  angle = ( angle / 57.29577951 ) ; //Convert degrees to radians
  int x3 = ( clockCenterX + ( sin(angle) * ( clockRadius - ( clockRadius / 5 ) ) ) );
  int y3 = ( clockCenterY - ( cos(angle) * ( clockRadius - ( clockRadius / 5 ) ) ) );
  display->drawLine( clockCenterX + x , clockCenterY + y , x3 + x , y3 + y);
  //
  // display minute hand
  angle = timeClient.getMinutes() * 6 ;
  angle = ( angle / 57.29577951 ) ; //Convert degrees to radians
  x3 = ( clockCenterX + ( sin(angle) * ( clockRadius - ( clockRadius / 4 ) ) ) );
  y3 = ( clockCenterY - ( cos(angle) * ( clockRadius - ( clockRadius / 4 ) ) ) );
  display->drawLine( clockCenterX + x , clockCenterY + y , x3 + x , y3 + y);
  //
  // display hour hand
  angle = timeClient.getHours() * 30 + int( ( timeClient.getMinutes() / 12 ) * 6 )   ;
  angle = ( angle / 57.29577951 ) ; //Convert degrees to radians
  x3 = ( clockCenterX + ( sin(angle) * ( clockRadius - ( clockRadius / 2 ) ) ) );
  y3 = ( clockCenterY - ( cos(angle) * ( clockRadius - ( clockRadius / 2 ) ) ) );
  display->drawLine( clockCenterX + x , clockCenterY + y , x3 + x , y3 + y);
}

void digitalClockFrame(OLEDDisplay *display, OLEDDisplayUiState* state, int16_t x, int16_t y) {
  String timenow = String(timeClient.getHours())+":"+twoDigits(timeClient.getMinutes())+":"+twoDigits(timeClient.getSeconds());
  display->setTextAlignment(TEXT_ALIGN_CENTER);
  display->setFont(ArialMT_Plain_24);
  display->drawString(clockCenterX + x , clockCenterY + y, timenow );
}

// This array keeps function pointers to all frames
// frames are the single views that slide in
FrameCallback frames[] = { analogClockFrame, digitalClockFrame };

// how many frames are there?
int frameCount = 2;

// Overlays are statically drawn on top of a frame eg. a clock
OverlayCallback overlays[] = { clockOverlay };
int overlaysCount = 1;

void setup_SSD1306()
{
  // The ESP is capable of rendering 60fps in 80Mhz mode
  // but that won't give you much time for anything else
  // run it in 160Mhz mode or just set it to 30 fps
  ui.setTargetFPS(30);

  // Customize the active and inactive symbol
  ui.setActiveSymbol(activeSymbol);
  ui.setInactiveSymbol(inactiveSymbol);

  // You can change this to
  // TOP, LEFT, BOTTOM, RIGHT
  ui.setIndicatorPosition(TOP);

  // Defines where the first frame is located in the bar.
  ui.setIndicatorDirection(LEFT_RIGHT);

  // You can change the transition that is used
  // SLIDE_LEFT, SLIDE_RIGHT, SLIDE_UP, SLIDE_DOWN
  ui.setFrameAnimation(SLIDE_LEFT);

  // Add frames
  ui.setFrames(frames, frameCount);

  // Add overlays
  ui.setOverlays(overlays, overlaysCount);

  // Initialising the UI will init the display too.
  ui.init();

  display.flipScreenVertically();
}

void setup() {
  // put your setup code here, to run once:
  Serial.begin(115200);

  WiFi.begin(ssid, pass);

  while (WiFi.waitForConnectResult() != WL_CONNECTED) {
    Serial.println("Connection Failed! Rebooting...");
    delay(5000);
    ESP.restart();
  }

  // Port defaults to 3232
  // ArduinoOTA.setPort(3232);

  // Hostname defaults to esp3232-[MAC]
  // ArduinoOTA.setHostname("myesp32");

  // No authentication by default
  // ArduinoOTA.setPassword("admin");

  // Password can be set with it's md5 value as well
  // MD5(admin) = 21232f297a57a5a743894a0e4a801fc3
  // ArduinoOTA.setPasswordHash("21232f297a57a5a743894a0e4a801fc3");

  ArduinoOTA.onStart([]() {
    String type;
    if (ArduinoOTA.getCommand() == U_FLASH)
      type = "sketch";
    else // U_SPIFFS
      type = "filesystem";

    // NOTE: if updating SPIFFS this would be the place to unmount SPIFFS using SPIFFS.end()
    Serial.println("Start updating " + type);
  });

  ArduinoOTA.onEnd([]() {
    Serial.println("\nEnd");
  });

  ArduinoOTA.onProgress([](unsigned int progress, unsigned int total) {
    Serial.printf("Progress: %u%%\r", (progress / (total / 100)));
  });

  ArduinoOTA.onError([](ota_error_t error) {
    Serial.printf("Error[%u]: ", error);
    if (error == OTA_AUTH_ERROR) Serial.println("Auth Failed");
    else if (error == OTA_BEGIN_ERROR) Serial.println("Begin Failed");
    else if (error == OTA_CONNECT_ERROR) Serial.println("Connect Failed");
    else if (error == OTA_RECEIVE_ERROR) Serial.println("Receive Failed");
    else if (error == OTA_END_ERROR) Serial.println("End Failed");
  });

  ArduinoOTA.begin();

  Serial.println("Ready");
  Serial.print("IP address: ");
  Serial.println(WiFi.localIP());

  setup_SSD1306();
  timeClient.begin();
}

void loop() {
  // put your main code here, to run repeatedly:
  ArduinoOTA.handle();

  timeClient.update();

  int remainingTimeBudget = ui.update();
  if (remainingTimeBudget > 0) {
    // You can do some work here
    // Don't do stuff if you are below your
    // time budget.
    delay(remainingTimeBudget);
  }
}
ほとんどは案内されていた サンプルソース の、ほぼコピペです。(わずかに手を加えてますが95%は元のまま)
OTA ですが、Windows のデフォルトのままだとファイアウォールが邪魔して書き込みできません。
Windows ファイアウォール→許可されたプログラムに「・・・espressif\esp32\tools\espota.exe」を追加しましょう。
OLED の制御について今のところ全く理解してませんが、ただのキャラクタ液晶かと思ってたら 128x64 なグラフィック液晶なんですね。
これでたったの9ドルとは・・・かなり強烈です。
(追記)
起動して数分〜数十分で表示の基準座標が狂う現象が発生しています。
基準点(Y軸)が真ん中あたりに動いてアナログ時計が半分に割れて上下に表示されたり、文字が鏡のように反転されて表示されたり、なんか挙動不審です。
サンプルをコピペしただけのソースを斜め読みした限り、特にそんな高尚な指定はしていないぽいのですが・・・
もし原因がわかったら続報を書こうとは思いますが、はてさて。
書き込みの作法が変な件と併せて、外れ固体を引いただけなら話は早いんですけど。
(追記)2017/05/10
表示が狂う件ですが
FrameCallback frames[] = { analogClockFrame, digitalClockFrame };
の部分を弄って原因の切り分けを試みたところ
FrameCallback frames[] = { analogClockFrame, analogClockFrame };
は問題なし(数時間でも表示狂わない)
FrameCallback frames[] = { digitalClockFrame, digitalClockFrame };
は NG となりました。
アナログ時計よりも構造がシンプルに見えるデジタル時計のフレーム描画のほうに何か問題が潜んでいるようです。
表示を豪華に見せるラッパー OLEDDisplayUi の問題だと思いますので、これを使わず OLEDDisplay を直に操作すれば大丈夫だと思います。(豪華に見えなくなりますが)
OLEDDisplayUi の中も軽く追いかけてみるか・・・
(追記)2017/05/11
キャラクタ液晶でなくグラフィック液晶と言うことは、液晶のハード側にフォントデータを持ってないだろうから、フォントデータを展開して表示させてるのかい?という取っかかりから調べていきましたところ、OLEDDisplayFonts.h という(マイコンにしては)巨大なサイズのファイルを見つけ、これがフォントデータそのものであることを確認しました。
OLEDDisplayFonts.h
const char ArialMT_Plain_10[] PROGMEM = {
ってな具合な書き方で始まっていたので、きっと 4MB の External Memory にフォントデータを格納してるんだよな・・・って思うじゃないですか。
いちお __attribute__((section(〜 の中身を確認しようと PROGMEM で Core を Grep して見つけたわけですが
espressif\esp32\cores\esp32\pgmspace.h
#define PROGMEM
#define PGM_P         const char *
#define PGM_VOID_P    const void *
#define FPSTR(p)      ((const char *)(p))
#define PSTR(s)       (s)
#define _SFR_BYTE(n)  (n)

#define pgm_read_byte(addr)   (*(const unsigned char *)(addr))
#define pgm_read_word(addr)   (*(const unsigned short *)(addr))
#define pgm_read_dword(addr)  (*(const unsigned long *)(addr))
#define pgm_read_float(addr)  (*(const float *)(addr))
ええっと・・・あのぅ・・・これって・・・
コンパイルエラーが出ないように潰してあるだけ!
const 明示するだけで自動的に(勝手に) 4MB の External Memory に配置してくれる!?んな訳ないよな。。
断定はできませんが、Internal Memory にフォントデータが配置され、それにより容量的にカツカツすぎて悪さしてる気がします。
PROGMEM や ICACHE_FLASH_ATTR、ICACHE_RODATA_ATTR あたりをキーワードにネットサーフィンしてみるも、ヒットするのは ESP8266 関係のみ。
うーん・・・