ESP8266 ガイガーカウンターの製作
昨年の秋頃より、実家に設置してあった超高感度モニタリングポストが欠測となり、年末の帰省で装置一式を回収してきた次第ですが、強風で吹き飛んだらしく、貴重な J209 が1本破損。
それ以外にも、PoEコネクタの接点が腐食してピン自体がなくなってしまっていたりと、いわゆるボロボロ状態でした。
修理・交換し、mbed との組み合わせで正常に計測できるようにはなりましたが、3ヶ月ほど前に ESP8266 割り込みパルスカウント(ガイガーカウンターの心臓部) という記事を書いていて放置していたことに気がつきました。
ESP8266 ベースでガイガーカウンターを作るんだった・・・
(ソフトだけ公開しててハードを未公開だった)
ということで回路図です。
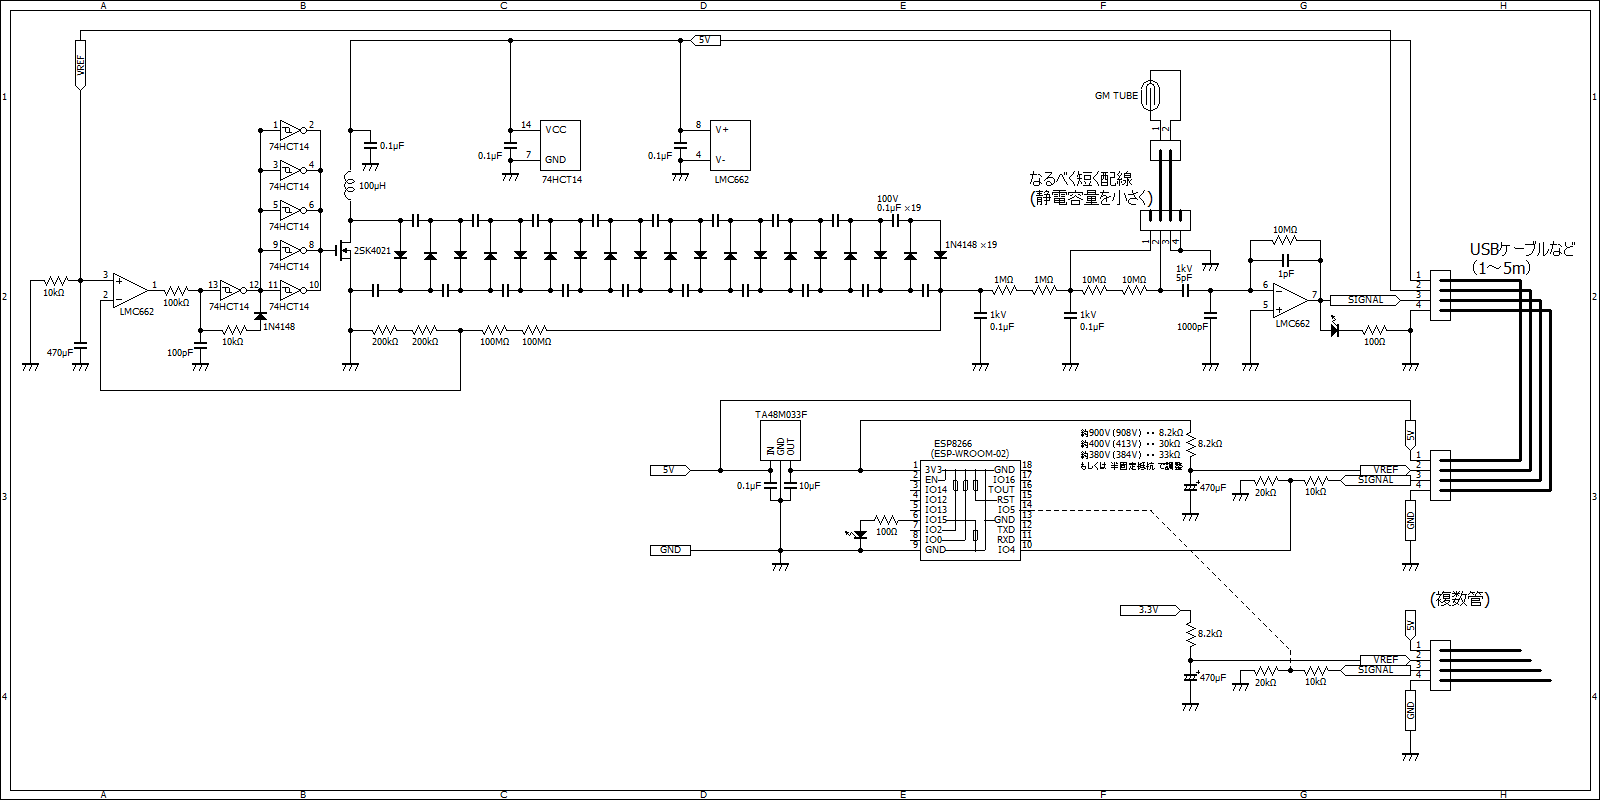
※ クリックすると等倍で見れます
上半分はお馴染みの 汎用ガイガー検波ユニット です。
以前に Fusion に発注して PCB基板 に起こしたことがあるアレですね。
かなり耐圧ギリギリ(ややオーバー)ですけれど、いちおアノード電圧 1000V くらいまで対応します。
コッククロフト初段の MOSFET は秋月で扱いの始まった 2SK4021 に変更してありますが、VDS が 100V 以上あれば基本的に何でも大丈夫かと。
アノード電圧は、3.3V を基準電源に見立てて検波ユニット内の 10kΩ との分圧抵抗で決定されます。
回路図のとおり 8.2kΩ で、J209 向けに 約900V が生成されます。
(違う管のときはメモに従って抵抗値を選択して下さい)
汎用ガイガー検波ユニットを複数用意することで、複数管にも対応します。(右下点線の回路図付近)
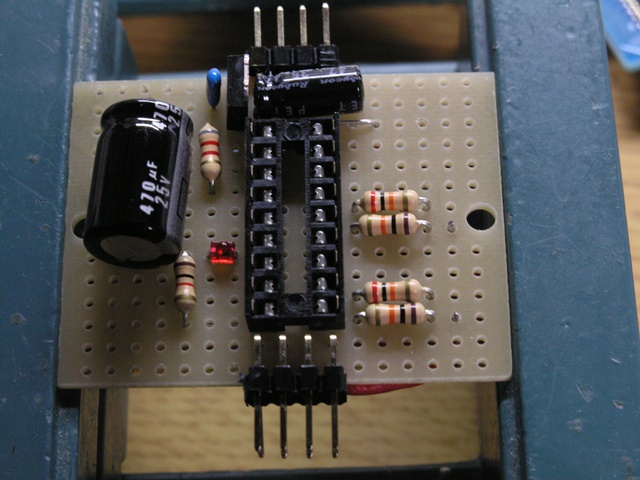
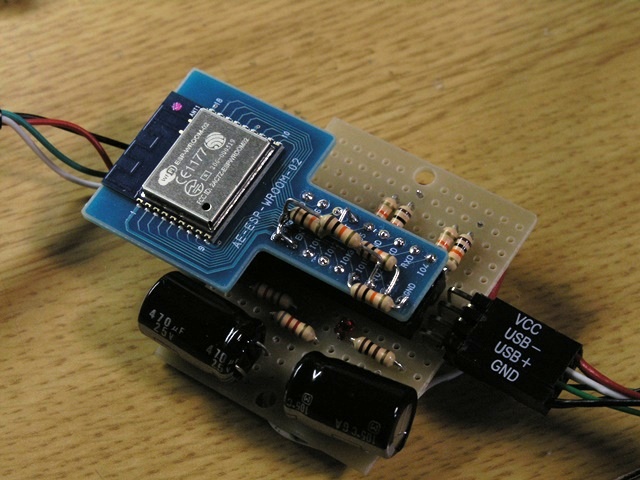
| まずは1管むけに試作 | 複数管に対応させる |
 |
 |
面倒なことは全て 汎用ガイガー検波ユニット がやってくれるので、ESP8266 としてはパルスカウントするのみ。
検波ユニットからの信号は 5V の矩形波なので、20kΩ+10kΩ で分圧し 2/3 に電圧変換しています。
Logoole へ送信する前提でソース載せておきます。
sendWriteKey、ssid、pass は各自の環境に合わせてセットして下さい。
※出力項目名は Mark2 と互換にしましたので、Logoole の画面から API取得 するときの用途は「若松ガイガーカウンター Mark2」を選択して下さい。
#include <Ticker.h>
#include <ESP8266WiFi.h>
#include "ntpClient.h"

Ticker ticker;
Ticker led;

// User Settings
const char *ssid = "<Set Your SSID>";
const char *pass = "<Set Your Password>";
const char *sendWriteKey = "<Set Your WriteKey>";
const unsigned short sendPeriod = 300; // send every 5minute

const unsigned char pinSignal[] = {4};      // signal pin(s)
//const unsigned char pinSignal[] = {4, 5}; // if 2tubes

const char *sendServer = "api.logoole.etr.jp";
const unsigned char pinLED = 15;
const unsigned short l_sma = 60 * 60; // 1hour
const unsigned short m_sma = 60 * 10; // 10minuts
const unsigned short s_sma = 60;      // 1minute
const unsigned short max_tubes = sizeof(pinSignal);
const unsigned char timezone = 9;

volatile unsigned char cps[max_tubes][l_sma];    // max 255cps
volatile unsigned short idx_cps = 0;
volatile unsigned long countup = 0;
volatile unsigned long wakeup = 0;
volatile unsigned long total_count[max_tubes];
volatile float l_cpm[max_tubes];   // l_sma 秒の移動平均
volatile float m_cpm[max_tubes];   // s_sma 秒の移動平均
volatile float s_cpm[max_tubes];   // m_sma 秒の移動平均
volatile bool sendMeasurement = false;

void setup() {
  // put your setup code here, to run once:
  pinMode(pinLED, OUTPUT);
  digitalWrite(pinLED, HIGH);

  Serial.begin(115200);
  Serial.println();

  Serial.print("WiFi connecting to ");
  Serial.print(ssid);
  WiFi.begin(ssid, pass);

  while (WiFi.status() != WL_CONNECTED) {
    delay(1000);
    Serial.print(".");
  }
  Serial.println("");
  Serial.print("WiFi connected");
  Serial.print(" IP:");
  Serial.println(WiFi.localIP());

  wakeup = getTime();   // get time from ntp
  digitalWrite(pinLED, LOW);

  for(int t=0; t<max_tubes; t++)  {
    pinMode(pinSignal[t], INPUT);
    for(int i=0; i<l_sma; i++)  cps[t][i] = 0;
    total_count[t] = 0;
    l_cpm[t] = 0.0f;
    m_cpm[t] = 0.0f;
    s_cpm[t] = 0.0f;
  }

  attachInterrupt(pinSignal[0], signal0, RISING);
  if(max_tubes == 2)
    attachInterrupt(pinSignal[1], signal1, RISING);

  ticker.attach(1, tick);
}

String float2String(float value)  {
  String result;
  result = (String)((int)value);
  result += ".";
  value -= (int)value;
  result += (int)(value * 100);

  return result;
}

void loop() {
  // put your main code here, to run repeatedly:
  static unsigned long SEQ = 0;
  if(sendMeasurement) {
    // for logoole
    SEQ ++;
    String postData = "SEQ=" + (String)SEQ;
    postData += "&UPTIME=" + (String)(countup * l_sma + idx_cps);
    postData += "&DATETIME="+getTimeString(wakeup + countup * l_sma + idx_cps + timezone * 60 * 60);

    if(max_tubes == 1)  {
      postData += "&F_COUNT=" + (String)(total_count[0]);
      postData += "&L_CPM=" + float2String(l_cpm[0]);
      postData += "&CPM=" + float2String(m_cpm[0]);
      postData += "&S_CPM=" + float2String(s_cpm[0]);

    } else if(max_tubes == 2) {
      postData += "&F_COUNT=" + (String)(total_count[0] + total_count[1]);
      postData += "&L_CPM=" + float2String(l_cpm[0] + l_cpm[1]);
      postData += "&CPM=" + float2String(m_cpm[0] + l_cpm[1] );
      postData += "&S_CPM=" + float2String(s_cpm[0] + s_cpm[1]);
      postData += "&F_COUNT_0=" + (String)(total_count[0]);
      postData += "&L_CPM_0=" + float2String(l_cpm[0]);
      postData += "&CPM_0=" + float2String(m_cpm[0]);
      postData += "&S_CPM_0=" + float2String(s_cpm[0]);
      postData += "&F_COUNT_1=" + (String)(total_count[1]);
      postData += "&L_CPM_1=" + float2String(l_cpm[1]);
      postData += "&CPM_1=" + float2String(m_cpm[1]);
      postData += "&S_CPM_1=" + float2String(s_cpm[1]);

    }

    WiFiClient client;
    if(client.connect(sendServer, 80))  {
      client.print("POST /");client.print(sendWriteKey);client.print(".post HTTP/1.1\n");
      client.print("Host: ");client.print(sendServer);client.print("\n");
      client.print("Content-Type: application/x-www-form-urlencoded\n");
      client.print("Content-Length: ");
      client.print(postData.length());
      client.print("\n\n");
      client.print(postData);
      client.print("\n\n");
      Serial.println(postData);
    }
    sendMeasurement = false;
  }
}

void signal0() {
  signal(0);
}

void signal1() {
  signal(1);
}

void signal(int t) {
  cps[t][idx_cps] ++;
  total_count[t] ++;
  digitalWrite(pinLED, HIGH);
  led.attach(0.0001f, ledoff);
}

void ledoff() {
  digitalWrite(pinLED, LOW);
  led.detach();
}

void tick() {
  for(int t=0; t<max_tubes; t++)  {
    l_cpm[t] = 0.0f;
    m_cpm[t] = 0.0f;
    s_cpm[t] = 0.0f;
  }

  idx_cps ++;
  if(idx_cps == l_sma)  {
    idx_cps = 0;
    for(int t=0; t<max_tubes; t++)  l_cpm[t] = cps[t][idx_cps];
    countup ++;
  }

  for(int t=0; t<max_tubes; t++)  {
    cps[t][idx_cps] = 0;

    int cnt = 0;
    int idx = idx_cps;
    while(cnt < (!countup ? idx_cps : l_sma)) {
      if(!idx)  idx = l_sma;
      idx --;
                      l_cpm[t] += cps[t][idx];
      if(cnt < s_sma) s_cpm[t] += cps[t][idx];
      if(cnt < m_sma) m_cpm[t] += cps[t][idx];

      cnt ++;
    }

    l_cpm[t] *= (60.0f / (!countup                    ? idx_cps : l_sma));
    m_cpm[t] *= (60.0f / (!countup && idx_cps < m_sma ? idx_cps : m_sma));
    s_cpm[t] *= (60.0f / (!countup && idx_cps < s_sma ? idx_cps : s_sma));
  }

  if(!(idx_cps % sendPeriod)) // send every X minute(s)
    sendMeasurement = true;
}
(追記)
Logoole のグラフを貼っときます。(屋内、テキトー置き)
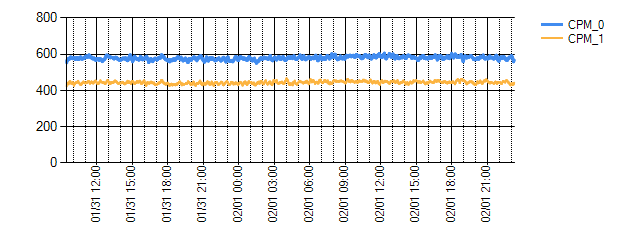
土壁が発する天然放射線の影響で、屋外よりも高めという残念な住環境ではありますが、mbed 使用時と変わらず正確に測定されている感じです。
(追記)
こちらのプログラムですが、数十分おきに不定期に再起動する現象を確認しています。
海外の本家フォーラム( AttachInterrupt random crashes · Issue #1403 )で論じられてる現象と全く一緒で、Arduino のライブラリに起因するバグのようです。
この前の SSID 32文字 の件 といい、ライブラリの出来がイマイチですねー。
(Arduino を使わないでネイティブ開発しろ、ってか?)
(追記)2016/04/30
NE555 を用いた汎用検波ユニットを制作しました。
ちょっと消費電力は増えますが、〜500V であればコッククロフトなし、〜1000V でもコッククロフト1段で済みます。
気になる方はこちらをどうぞ